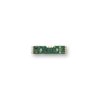
Product Support for: Mobile Decoders -> 1.0 Amp HO Scale Mobile Decoder for Atlas HO Locomotives (DH165A0)
View the Product Page for the DH165A0DH165A0 fits Athearn Genesis, Kato, Stewart, Atlas & Other HO Locomotives.
Compatible with Sound Bug Sound Only Decoders
Decoder Lock equipped
7 Articles Found for DH165A0
The DH165A0 is set up at the factory to control six function outputs. The DH165A0 is configured to control the forward-headlight F0F/white lead and reverse-headlight F0R/yellow lead for directional lighting. These two headlight function leads are current regulated for LEDs or lamps, with factory setting of approx 15mA, with no resistors required. Cut the ADJ link to increase headlight current to approx 30mA (see figure below). Functions F1 (Green), F2 (Violet), F3 (Brown) and F4 (White/Yellow) are full track voltage and can be used by soldering a wire from the pad for the function you wish to use to the ...
I am installing a DH165A0 in an Athearn SD70. The head light outputs are a nominal 30 ma (with the link cut). The bulbs were of course a bit lower in their current demands and were very bright for a short while. Is there any way to lower the current output from 30ma or do I need to add a resistor in line with the bulb to drop the voltage output? Of course if it is supposed to be a regulated current output this might be a problem. The DH165A0 has a constant current source for F0F and F0R, so ...
1. Carefully remove the locomotive's shell from the frame. Notice the orientation of the circuit board inside so that you can install the decoder in the same orientation. (Figure 1) 2. Remove the 10 black plastic plugs from the lightboard that secure the wires to the PCB. There are 4 plugs (retainers) on each end and 2 on the side for the motor connection. Remove the red and black wires, carefully noting where each wire originally connected to the PCB. Remove the lightboard itself by pinching the black plastic release tabs and pulling the board up and off of the ...
I have a DH165AO decoder and Sound Bug and am installing the decoders into an Athearn SD70 Locomotive.The motor controller works and the sound as well. However, I am unable to get the lights to work. I connected the wire leads exactly as they where on the Athearn light board. Athearn uses twin forward and rear 1.5 volt lights yet the DH165AO will not power the bulbs. It will power one bulb at either end but not two. The single bulb setup glows very brightly but for a short time. So I tried using the 47 ohm resistor in parallel ...
Our thanks go to Digitrax operator Aksel Suarez of Chesapeake, Virginia for sending this tip on how to install a Digitrax decoder in the Walthers GP15, called by some prototype railroaders a "Geepette" or "Cheep Geep". Use a DH165A0 decoder to replace the existing light board. Remove the plastic clips that hold the wires to the light board. Once the light board has been removed, place a piece of electrical tape on the metal frame to isolate the decoder from the frame and prevent a short circuit. The wires on the locomotive to the motor and lights do not follow ...
Q: What is the white wire for on the SoundBug? A: The white wire is used on conjunction with a driver cam for steam sound synchronization. Q: What type/size loco does "generic" steam sound represent? A: This sound was based on recordings of Union Pacific 3985, a 4-6-6-4 "Challenger" type. Q: Does the Sound bug come with an oval speaker to fit in the shell of the older model GPs or SDs that do not have space in the fuel tank. A: The SoundBug comes with a 28mm round speaker but others may be substituted. The included-speaker is rated at ...
Note the SFX006 is identical. These instructions pertain to both Soundbugs. 1) Identify the correct orientation and mounting side of the DH165 series Decoder with SFX004 Soundbug Socket to plug this sound module into. There is text saying "SFX here" etc,. The SFX004 must only be mounted from the correct side and orientation, for each of the DH165 host decoders. 2) With correct orientation noted from step 1, align the dual row of SFX004 connector pins to the matching holes in the DH165 host PCB. Apply gentle and firm pressure behind the SFX004 connector to engage the pins until ...