KB504: Kato NW2 Installation Instructions

This article was last updated on Sept. 3, 2011, 4:04 p.m. | Print Article | Leave Feedback

Move to decoder installation section? on main site or set up decoder installation notes in TSD?

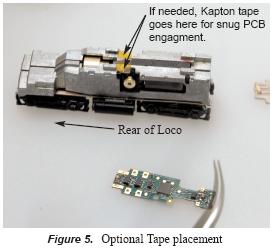
DN123K3 Kato NW2 Installation Instructions


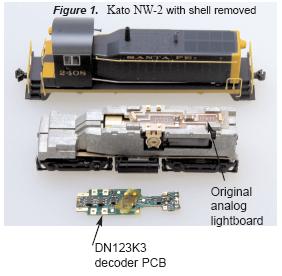
1. Carefully remove the locomotive’s shell from the frame (Figure 1). Notice the orientation of the shell to the frame so that you can reinstall correctly.
2. To remove the Kato NW2 standard lightboard you will need to remove the motor clips first. The NW2 Motor clips can be most easily removed by rotating the motor gently so that the circular motor brush caps release the motor clip. Next pull the motor clip directly off each side of the lightboard. Remove the lightboard by pulling forward and then upward from the frame halves (Figure 2):
3. Before moving on the decoder PCB installation, take a moment to retension the motor clips according to the following diagram. (Figure 3):
4. Place the DN123K3 decoder in as shown (Figure 4). The decoder should be placed down and backward, so as to engage frame clips. If done correctly, the decoder should fit snugly.
5. If needed, one or more strips of Kapton tape can be placed as a spacer to raise the PCB up as shown (Figure 5) across the frame halves, in order to minimize unwanted movement of the decoder Printed Circuit Board.
6. Finally, re-install the NW2 Motor clips. (Figure 6):
7. You are now ready to run your locomotive. The DN123K3 is factory programmed to address 03. You can easily customize the address and other features.

Was this article helpful? Send us feedback!

Questions or Comments on this article? Please visit helpdesk.digitrax.com and submit a ticket. Please reference the KB article number in your ticket.