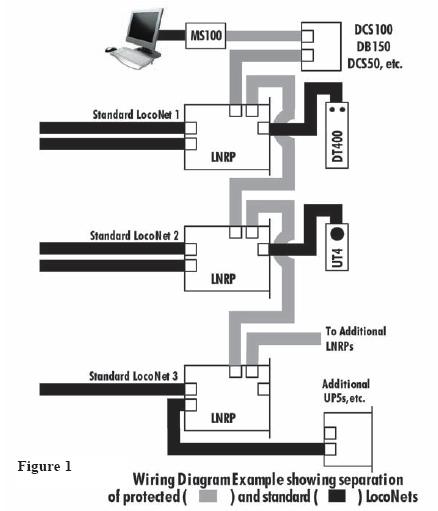
Installation: Figure 1 shows the general arrangement for connecting one or more LNRP's to configure a LocoNet based system for operation.
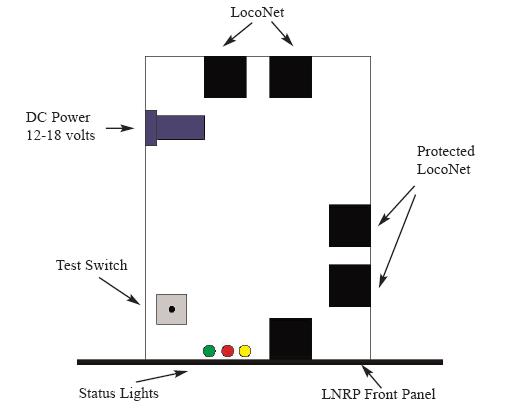
Note that the LNRP's drive the power and Railsync signals on the "standard" LocoNet cable segments, so each LNRP should have a DC input of +15V to +18V at up to 250mA supplied on the side DC power jack.
Note that the shaded cable connections are made from the protected network side connections of the LNRP units to the components that are on the "protected" or high reliability part of the System.
The other solid cable connections are the separate "standard" sub-LocoNets that the LNRP connects to the separate "protected" LocoNet.
Operation: If a wiring or signal problem occurs on any "standard" LocoNet section that the LNRP is connecting and monitoring, the LNRP will act to internally disconnect the faulty "standard" LocoNet segment so that the "protected" LocoNet can continue operating.
If the fault is removed, the LNRP will typically automatically reconnect and resume operations on the "standard" LocoNet segment.
The system Command Station, at a minimum, should be connected to the protected LocoNet cabling.
A PC connection may also be connected to the protected LocoNet or can be on a "standard" LocoNet.
In particular Throttles and any other devices or wiring that may be connected during operation and cause LocoNet shorts or other problems should always be connected on a "standard" LocoNet.
At power ON the LNRP checks that the attached cables will allow proper data transmission before starting operations.
If a fault is detected, the LNRP will flash the LED codes shown in Table 2 (below), to allow the type of fault to be diagnosed and corrected. LED Codes:
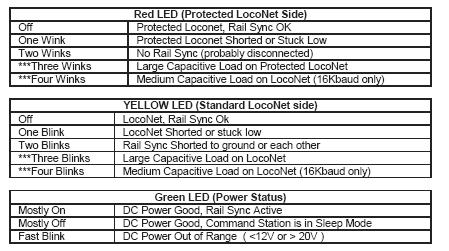
A Blink is defined as a light that's mostly off, and then on momentarily A Wink is defined as a light that's mostly on, and then off momentarily Connection & Component Locations: