Digitrax Complete Train Control
By Zana & A.J. Ireland
Digitrax Complete Train Control makes reliable, realistic train operation and simplified layout wiring a reality. Digital Command Control is incorporated within the Digitrax system to let you control multiple trains independently on the same section of track without blocking. In the real world, engineers control the speed and direction of real trains. Engines operate under their own power independent of the track. Each engine has its own motion characteristics like how fast it speeds up (acceleration) and how long it takes to slow down (deceleration). A locomotive's performance is influenced by whether it is operating alone or as part of a multiple unit lash-up. The weight of the train affects its performance, too. Digitrax gives reliable control over all these variables so your model railroad runs like the real thing!
You become the engineer at the throttle, controlling speed and direction of one or more locomotives, each with its own performance characteristics. As a good engineer, you must obey the signals and watch for other trains because, there are no electrical blocking restrictions to prevent those pesky "cornfield meets."
 Conventional DC Operation
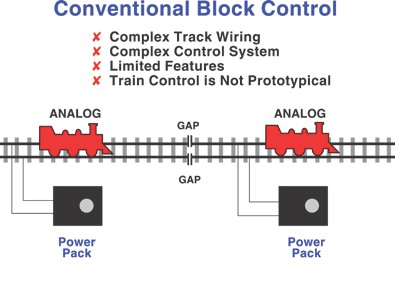
With conventional blocking, train operation depends on complex track wiring. Each block is powered and wired separately to allow more than one train to move around the layout. Trains move one block at a time; using insulated blocks and toggle switches to control power routing. This requires a lot of time and expense to wire and debug before you are up and running. Once you have it wired you have to learn to "play the piano" and remember the rules to keep the trains moving. Operation with conventional DC is not prototypical and the features available are limited.
 Why Digital Command Control Is Different
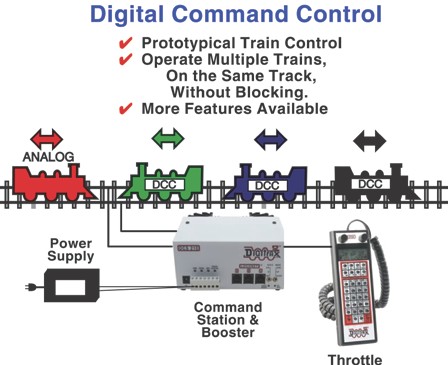
With Digitrax, train operation depends on the decoder installed in the locomotive. The track is
powered by a command station and/or booster connected to a power supply. Each locomotive operates independently over the track. Several locomotives can be moving at different speeds and in either direction at any time on the same electrical section of track. Blocking is not required for train control. It's easy to move engines around in the yards and park them close to one another without worrying about where the insulated sections are.
With Digitrax you are actually running your trains, instead of running your track. You also have access to features like function control for lighting and sounds and advanced train control.
DCC Industry “Standards” for Interoperability
The NMRA has established what they call a “Digital Command Control (DCC) Standard” that defines the basic communications protocol at the track level for digital control signals via the rails. It specifies communications between the command station and decoder without specifying command station or decoder hardware. The data that controls each decoder is transmitted in packet format on the rails in the form of a balanced square wave. This baseline packet format allows for basic interoperability among equipment made by different companies that choose to build interoperable equipment. This basic interoperability is the key.
Manufacturers understand that interoperability among our products is important to our customers. It protects our customer’s investment in their layout control systems and allows products made by one manufacturer to be used with other compatible manufacturers’ products. Any technology that is available from more than one source is not as likely to disappear and leave its users stranded. Also, having equipment available from multiple suppliers creates competition in price and features to the benefit of the end user.
The “standard” does not (nor should it ever) cover the command stations, control equipment, wiring connections or network used to operate the decoders or the features they offer. You can buy a full-featured DCC command station or a basic DCC command station. You can spend more money or less money. There is a place in the market for both low end and high-end equipment. You decide what makes sense for you and your railroad.
DCC industry standards provide basic interoperability but are not enough to run most modern layouts that have progressed beyond the basic stage. Most of the innovations in layout control are not part of the formalized NMRA “standards & RPs.” These innovations include: automatic reversing boosters and devices, 128 speed step control, analog locomotive operation, various cab bus and booster bus syste
ms, a network for layout operation, cost effective, block detection systems, sound decoders, system upgradeability, new “painless” ways of installing decoders, transponding and feedback technologies, sound decoders, under layout sound systems, infrared and radio wireless operation and much more to come. The “standard” is just the starting point!
DCC compatible products are labeled by manufacturers in several ways. The most common is simply a claim of DCC compatibility on the package. Sometimes you will see a DCC logo on packaging. No matter how a particular DCC compatible product is labeled, in the end what is really important is DCC interoperability and getting the features you want at a reasonable price.
Interoperability means that components from one DCC compatible manufacturer will work with DCC components made by other DCC compatible manufacturers. Because of the complexity of the technology involved with DCC and other layout control products, this is not always as easy as it sounds. In some cases, such as decoder programming methods, the “standards & RPs” actually allow conflicts to occur. The bottom line is that in over 99% of all cases, DCC products that claim to be DCC compatible do in fact interoperate very well. In the few cases where problems have occurred, DCC manufacturers have moved quickly to provide solutions. DCC compatible manufacturers will continue to produce and support interoperable equipment for the simple reason that interoperability is good for business.
How is Digitrax Complete Train Control Different from Other DCC systems?
DCC technology is just one part of the Digitrax Complete Train Control System. Digitrax uses DCC as just one of many technologies to provide a complete solution to model railroad layout control & operations. Our integrated systems approach incorporates basic train control, advanced train control, turnout control, lighting and sound, detection, transponding, signaling and many other aspects of train control. By incorporating many different technologies in addition to DCC, Digitrax has the advantages of interoperability and basic train control offered by DCC but is not limited by just one single technology. With LocoNet, Digitrax customers have the best of both worlds. The Digitrax System is compatible with the DCC “standards and recommended practices” but is not limited to them in the features that can be offered. This is because the DCC “standards and recommended practices” are just one small subset of Digitrax LocoNet's broader system capabilities.
What Can Digitrax Complete Train Control Do For Me?
Digitrax Complete Train Control has something for everyone from the beginner to the advanced modeler and for every layout from the smallest to the largest. For beginning and intermediate modelers (most modelers classify themselves at this skill level) the advantages of reasonably priced simple command stations and simple layout wiring are very important. Modelers at this level can start with a Zephyr Xtra Set ($225.00 msrp). Intermediate to expert modelers and beginners with big plans usually start with an Evolution Set ($450.00 msrp). Advanced modelers who are ready to move to the next level typically add a DCS240 Advanced Command Station ($375.00 msrp) to their existing Digitrax equipment to expand their capabilities even further. It's easy to add components as your interest grows because every Digitrax set is based on LocoNet. If you decide you want more advanced features and functions from your command station or if you want to add a computer, it's an easy
transition from basic to full-featured command stations. The equipment you already own moves on with you as you add more features to your system. Your largest investment in time and money is in the decoders you install in the locomotives. These are upwardly compatible as you expand and add to your Digitrax system. With Digitrax adding components with new features is as simple as plug and play. By simply adding components you can grow into a more advanced system at your own pace and as your budget allows.
Most home layouts are small or medium sized. They typically have a limited amount of track available for block control. Digitrax has a real advantage in these situations. Since blocking is not required you can operate more locomotives in a smaller area. For the large home or club layout Digitrax offers prototypical operation, fewer wiring hassles and the availability of advanced features like block detection, transponding, computer control, etc.
Modular layouts running with Digitrax can operate more than just 2 or 3 trains at a time. Let's face it, the outside loop running clockwise and the inside loop running counterclockwise all day isn't very exciting. With the ease of LocoNet wiring, modular hook up is quick and de-bug is simple. This lets your club get operating sessions up and running more quickly.
How Many Trains Can I Run?
The number of trains you can run is determined by four factors:
- How many addresses your system supports.
- How many addresses your system can run at the same time.
- How much power your system can supply to the track.
- How many throttles your system supports.
Address Range: DCC systems support from 6 to over 9,000 addresses. This is the number of addresses you can assign to your decoders, not necessarily the number of locomotives you can run at a time. Most modern decoders allow both “2 digit” and “4 digit addressing”. Some, usually older model, decoders can only use “2-digit addressing.” The advantage to 2 digit addressing is that it is much simpler to use and you have 127 addresses available for use. The advantages of 4 digit addressing is that you can assign the number painted on the side of the locomotive as its address and you can have over 9,000 different addresses. Since all DCC decoders have two digit addresses, all DCC decoders can be run on basic DCC systems that support two digit addressing. On the other hand all DCC command stations that support four digit addressing also support two digit addressing so you can run can run both types of decoders on your layout equipped with a command station with four digit support. All Digitrax Starter Sets and Advanced Command Stations support both two and four digit addressing.
System Address Operating Capacity: DCC systems support varying numbers of addresses that can be run at the same time. Typically the number of addresses operating at the same time is between 4 and 400. Digitrax Zephyr Xtra can operate up to 20 mobile addresses at a time. The Evolution Set’s DCS210 command station can can operate up to 100 mobile addresses at the same time. With a DCS240 Command Station, you can operate up to 400 mobile addresses at the same time.
Power Requirements: The number of trains you can actually run will ultimately be determined by the amount of power you supply to your layout. Each booster is rated for between 3 & 8 amps. This means that you can run as many locomotives as your booster or boosters can power. To run more locomotives, you need to add more boosters. Digitrax boosters are available in 3.5 amp, 5 amp and 8 amp versions.
How Many Throttles Can Your System Support? Another factor that determines how many trains you can run is the number of throttles your layout control system will support. This is usually from 4 to 400 throttles. Digitrax Zephyr Xtra supports 20 throttles and Evolution supports 100 throttles. DCS240 Command Stations support 400 throttles. LocoNet allows you to expand as you need more throttles.
Can I MU Locomotives?
DCC systems offer three choices for consist control:
The Basic Consisting method is to program all the locomotives in a consist to the same address and run them on one throttle. In this case all the locomotives must be headed in the same direction: head to tail, head to tail, and head to tail. Basic consisting is available in all Digitrax Starter Sets.
Advanced Consisting stores the consist information in each decoder. The locomotives can be added to and deleted from the consist in any orientation head to head or tail to tail. This method requires that all locomotives in the consist be equipped with decoders that support this feature. This method allows you to set up a consist that will be "transportable" from one DCC layout to another but you must be sure to always put the locomotives back on the track in the same order and orientation you programmed them for or you will get unexpected results. Advanced consisting is available in all Digitrax Starter Sets.
Universal Consisting stores the consist information in the command station and allows you to consist locomotives with any DCC decoder as well as an analog locomotive without a DCC decoder. The locomotives can be added to and deleted from the consist in any orientation head to head or tail to tail. Universal consisting is the Digitrax preferred method of consisting and is available in all Digitrax Starter Sets. Digitrax prefers universal consisting because no "cooperation" from the decoder is required. Consists are controlled by the command station rather than by the decoders.
What other features are available with Digitrax Complete Train Control?
Locomotive motion control: Acceleration, deceleration, 14, 28, or 128 speed step control, scalable speed stabilization (back EMF), torque compensation, and more.
Throttle response control: Get more useable throttle range from 0 to full speed with a 3 step speed table with V-start, V-mid & V-max or even more control with a 28 step loadable speed table interpolated as 128 steps.
Function and Lighting Control: Bring your locos to life with lights, sound and action. Constant brightness directional lighting, automatic head/tail light reversing or separate control of head light and tail lights, FX-special lighting effects: Mars lights, gyra lights, ditch lights, strobes, rotating beacon, firebox flicker, flashing rear end device, and more.
Detection and Transponding: Know where specific locos and other rolling stock are located on the layout. Know when an area of track is occupied with detection. Know what is occupying that area with transponding.
Automatic Reverse Section Control & Short Circuit Management: Make operation more prototypical, more reliable and more fun. With automatic reversing sections, you won’t need to flip a switch to keep the trains moving. With short circuit management, a short in one area won’t stop the entire layout.
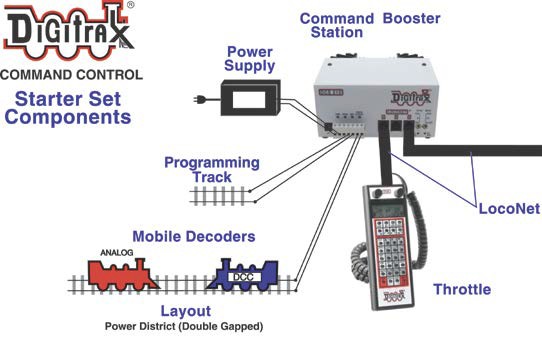
Components Needed To Get Started with Digitrax Command Control:
- Command Station-to generate DCC Packets and other digital control signals
- Booster-combines the DCC signal with power from the power supply and puts it on the track to run the trains
- Power Supply-power to run the system and the layout
- Throttle-inputs your commands to the system
- Mobile Decoder-the unit installed in the loco decodes DCC information and tells the loco what to do
- LocoNet-network that handles communications among system components
- Layout-the track and wiring you use to run your trains
- Programming Track-the special track used for setting up decoders during programming
Digitrax Starter Sets include the Command Station/Booster, Throttle and a mobile decoder. You provide the layout (with a programming track), power supply & LocoNet wiring.
 Command Station: Generates the DCC Packets
Digitrax offers three full-featured command stations. All Digitrax command stations are also DCC boosters.
DCS51-Zephyr Xtra Set ($225.00 msrp) Rated at 3.0 amps. Supports up to 20 active mobile decoder addresses and 20 active throttles. Separate programming output with read back capability.
DCS210 (not sold separately) Included with Evolution Starter Sets. Rated at 5/8 amps. Supports up to 100 active mobile decoder addresses & 100 active throttles. Separate programming output with read back capability.
DCS240 ($375.00 msrp) rated for 5or 8 amps based on power supply. Supports up to 400 active mobile decoder addresses & 400 active throttles. Separate programming output with read back capability.
Command stations are not compatible or interoperable among manufacturers.
Booster: Combines the DCC Signal with Power to Run the Trains
Boosters are the components that take the DCC signal generated by the Command Station and electrical power generated by the power supply and combines them to provide the power with the encoded digital packet signal to drive the rails. DCC manufacturers call these devices boosters, power boosters or power stations.
Standard Boosters simply boost the DCC signal and Auto reversing Boosters allow for complete automation of reverse loops. Boosters come with current ratings from 3 amps to 8 amps.
Digitrax offers several boosters and command station/booster combinations in different configurations to meet the needs of any layout. Starter sets come with command station/booster combination units.
Boosters are generally compatible among different DCC manufacturers.
Power Supply: Power to Run the Layout
All DCC systems, including Digitrax, require a power supply. Digitrax current starter sets include a power supply as part of the set. Most systems on the market today DO NOT include a power supply. Digitrax has chosen to include the power supply with all starter sets so that the user is ready to go with everything in the box. Make sure that any power supply you use for your railroad is properly rated, safe and appropriate for your situation. Energy efficiency standards enacted by governments around the world have affected they types of power supplies that are available as well.
Throttle: Inputs Your Commands to the Command Station
The throttle is the human interface for your layout control system. Some manufacturers call throttles "cabs."
Digitrax throttles are different from any conventional throttle you have ever used. The reason is that there are many more options with DCC than you had with conventional control and conventional throttles. Digitrax throttles give you control of speed & direction, like throttles you might have used in the past. With Digitrax throttles, you can control locomotive functions to turn lights on and off and activate sounds, etc. You can run more than one locomotive at a time. With dual encoder throttles you can run helper service like the prototype, separately controlling two locos or consists. You can program decoders, set up & break apart consists, dispatch locomotives, operate turnouts, operate other types of layout animation and much more with Digitrax throttles. More traditional looking throttles, like the UT4, are also available but they don’t give you access to all the possibilities of your Digitrax system. You might choose to use a combination of traditional throttles for road engineers and casual users and use the advanced throttles for yard operators who need all the features they provide.
Digitrax offers several throttle choices:
DT500 Series Throttles:
Full featured dual encoder super throttle with full numeric keypad. Infrared capable with UR90 IR Receiver/s.
DT500 ($189.00) Included in Evolution Starter Sets.
DT500D ($254.00) Duplex radio equipped version. Use with UR92 Duplex Transceiver for wireless operation. Included in Duplex Equipped Evolution Starter Sets.
UT4 Series Throttles:
Basic throttle with a traditional look and feel. Great for visitors and operators. Infrared capable with UR90 IR Receiver/s.
UT4 Utility Throttle ($79.95 msrp)
UT4D Duplex Equipped Utility Throttle ($135.00 msrp) Duplex radio equipped version. Use with UR92 Duplex Transceiver for wireless operation.
For wireless operation, Digitrax offers duplex radio and infrared capabilities
Both technologies can work together on the same layout. Infrared throttles can communicate with any UR receiver/transceiver. Duplex throttles communicate only with UR92 transceivers. Simplex radio throttles and UR91’s have been discontinued but continue to work on many layouts and can work along side duplex and infrared on the same layout.
Infrared operation
Evolution sets come with throttles that are equipped with infrared LEDs. All Digitrax throttles are equipped with infrared LEDs, too. To run your system with IR, you simply add one or more UR90 Infrared Receivers ($45.95msrp) around the layout and you are ready to go. Infrared is line of sight so, the throttles work best when the IR receivers are mounted above head height in the layout room.
Duplex Radio Equipped
Evolution Duplex Equipped Starter Sets ($660.00 msrp) are available if you want to go duplex radio from the start. Another option is to add duplex to an existing system by adding a UR92 Duplex Transceiver ($160.00 msrp) and DT500D Duplex Throttles or UT4D throttles. Check our website www.digitrax.com for duplex upgrade options for various throttles.
If you are worried about complex throttles, think back to the first time you read about block control and how complicated it all seemed back then. If you are worried about how to explain these new-fangled doo-dads to your operators, consider the “joys” of explaining how to run a blocked system to them. Converting to DCC does involve a learning curve but the rewards of prototypical operation are worth it!
Many users make their system selection based on the throttles available from a particular manufacturer. Every throttle out there has its advantages and disadvantages. It's up to you to choose the one that works best for you and how much you are willing to pay. Throttles are not readily interchangeable among DCC systems. So, you should consider all throttles available from a manufacturer when making your system selection.
Mobile Decoders: Decode DCC Packets Received from the Command Station via the Rails and Tell the Locomotives What to Do
These are the "chips" that go in the locomotives. Sometimes they are called receivers but they are really more that just receivers. Decoders actually decode the DCC signal and control the engine's speed, direction and other functions. There are many different decoder choices available from Digitrax. Decoders run locomotives according to the characteristics you have set up for each loco during programming. Characteristics like the loco’s address, acceleration, deceleration, start, mid-point and max voltages and many more variables can be programmed into decoders and will be “remembered” there until you change them.
All Digitrax decoders have built in light and function controls. Digitrax decoders have FX3 function leads that turn different functions on and off and can simulate prototypical lighting effects like Mars lights; ditch lights, Gyra lites, rotating beacons and other special lighting effects by using sophisticated algorithms that combine lamp periods, phases and intensities to make the effects look very realistic.
Digitrax decoders have both two digit (01-127) and four digit (0001-9,000+) address ranges available so they can be used on all DCC systems.
With Digitrax you can run one analog locomotive (without a decoder) along with the digital ones. This is analog operation capability is example of a feature that is not part of the “standard” but is incorporated in Digitrax products because it is important to customers. This analog operation capability, allows you to convert your fleet gradually. If one of your friends brings his unconverted locomotives over to run on your layout, your Digitrax system can handle it. Analog operation goes the other way too, if you want to run your Digitrax decoder equipped locomotive on a regular DC layout, your Digitrax decoders automatically convert to DC operation if there is no DCC signal present.
Most Digitrax decoders include transponding features that allow for seamless layout feedback on layouts equipped with transponding receivers and detectors.
LocoNet: Communications among Digitrax Components
 The Digitrax system is made up of components that are connected by LocoNet®. With LocoNet, your Digitrax system will give you excellent overall system performance every day and is expandable to meet your future needs, too. LocoNet is a real Peer to Peer Local Area Network (LAN). It is designed for high traffic capacity and utilization, free-form wiring topology (up to 2,000+' of random wire), and future system expandability and ease of upgrade. Digitrax gives you the ability add new components and features without obsoleteing existing equipment or capabilities and without having to open up existing products to change small parts.
Digitrax LocoNet runs on 6 conductor phone wire and uses phone jack type outlets. Most Digitrax customers purchase a roll of 6 conductor phone wire and a crimper to make up their own cables. You can use Digitrax UP5 Panels ($16.95 msrp) or 6 conductor phone jacks to provide connections to LocoNet. These units have two jacks in the front and two jacks in the back to make daisy chaining them a snap. UP5's also offer local track indicators and a place to add extra power to LocoNet throttles. These outlets can be daisy chained around the layout.
Each Digitrax starter set comes with a short LocoNet Cable & an LT1 Decoder/Cable Tester. We encourage you to test each LocoNet cable before you install it on the layout. Simply plug one end of the LocoNet Cable into your command station/booster and the other end into the LT1 tester. If all the lights come on, you know the cable is good. If they don't, then you can fix the problem before installing the cable.
LocoNet is topologically similar to an Ethernet type computer network. LocoNet includes two-way communications so it does not require a separate feedback bus like most other DCC systems. This is a huge advantage if you are planning to use feedback for layout control.
The LocoNet transmission protocol is similar to Ethernet "Carrier Sense Multiple Access with Collision Detect"(CSMA/CD) optimized for use in model railroad layouts. In addition to rapid multi-user access and smart prioritization, LocoNet is engineered to allow 100% traffic capacity with typically less than 1 in 300 collision rates. LocoNet pipelines multilevel protocol stacks and queues, similar to the ISO network layers and, the system uses less than 20% of the message types and commands potentially available. Everything else is specifically reserved for expansion. This type of architecture ensures today's LocoNet devices will always be able to understand and validate any future LocoNet message, even if the device cannot decode and execute the message. LocoNet has been carefully set up so that there is a consistent upgrade path and syntax for devices. This means you’ll never need an “accessory bus” and all of your LocoNet Devices will automatically integrate seamlessly.
The way each DCC manufacturer handles the communication among its system components is one of the major differences among the systems available today. When you are making your decision about which system to choose, be sure to look carefully at what each manufacturer's bus or network structure has to offer. Some factors to consider are ease of hook-up, ability to run multiple devices without slower response times, future expansion capabilities and overall system architecture. When you compare DCC systems, don't be fooled by statements about the speed of the bus/network because some types of
architecture actually require a faster data rate to handle the same amount of traffic that can be handled at a slower rate by others while allowing wiring flexibility.
Your Layout: Wiring Considerations for Digitrax Command Control
Your layout & rolling stock are the basis for a successful Digitrax installation. If your layout is not able to run trains with DC, it won't work with DCC either. With DCC the signal and the power go hand in hand so your layout and locomotives must have good conductivity to insure reliable train control. DCC is more tolerant of dirty track than some other command control systems because of the fact that the commands are sent over and over to the decoders. Periodic track cleaning will still be needed to be sure power is available to all areas of the layout and is being picked up by all equipment operating. So, let's turn our attention to wiring the layout and its power distribution bus.
Track Wiring
Early proponents of DCC touted the fact that you can hook up your railroad with just two wires. While this is technically correct, there are some issues that need clarification here. If you are wiring a new HO layout it is a good idea to use at least 16 gauge wire with feeders (22-24AWG) to each rail every 6-10 feet or so as a power bus. If you have an existing layout, the general rule is that if you can run regular DC engine around the layout, the wiring should be able to run DCC in most cases.
Once your wiring is complete and your Digitrax booster(s) are installed, use the "quarter trick" to determine whether your layout has adequate power. Simply power up the track and use a quarter coin (or other conductive item) across the rails to short the track. Your Digitrax boosters will beep and shut down if there is enough power. Try this at several locations around the layout and the booster should shut down each time. If the booster does not shut down, then you probably need to add more feeders or beef up your power bus to that area of the layout.
Unless you need to divide your layout into power districts for added power to run more trains, the only gaps you need are for hard shorts like reverse loops and un-insulated frogs. If you are already wired for block control, you probably don't need to rewire to use DCC. Just open all your blocks so that the entire track has power and you are ready to go. If you are using common rail wiring and you wish to use more than one booster to divide your layout into power districts, Digitrax recommends that you use double gaps between power districts.
Make sure LocoNet cables are built as straight through cables (they should not be reversing data cables) and that when you plug in your LocoNet devices that all the “pin 1s” are matched around the layout. Use the LT1 LocoNet tester to test all your cables to make sure they are built correctly. This is called phasing the layout and will give you the most reliable operation as you add new devices.
Digitrax offers LocoNet Cables and cable making kits for your convenience. Check our website www.digitrax.com for all the LocoNet wiring items we have available.
Direct Home Wiring vs. Common Rail Wiring
Digitrax strongly recommends direct home wiring even though, Digitrax can be run successfully with either layout wiring method. If you wish to run your Digitrax system with common rail, be sure to special order opto-isolated boosters for your layout.
Whole layout common rail is a method of wiring layouts where power districts and their boosters are connected electrically by a common rail or common power bus return wire. This method is traditionally used for conventionally controlled layouts. The track feeds for one rail are connected together to one output of the power pack. The other rail is gapped and the track feeds are connected to the power pack through block control switches.
Pros of common rail: Familiar, traditional wiring method that has been used for almost 100 years. Many existing conventional layouts are wired common rail.
Cons of common rail: Unstructured electrical partitioning. Special wiring is needed for reverse section handling and pick-ups on steam locos may have to be re-wired. High voltage stresses occur when locos cross gaps between power districts (up to 44 volts!). The "welding cable" common. Boosters must be opto-isolated (this makes boosters cost more). Detection systems
are not able to independently monitor whether zone power is on or off, there is no way to tell whether occupancy detection is actually working in any given detection section.
Direct home wiring is a layout wiring method where each power district and its booster are electrically isolated. The track within each power district may use "common rail" wiring for detection and/or power management. Direct home wiring is the wiring method recommended by Digitrax for safety reasons & also because it makes detection work more prototypically.
Pros of Direct Home Wiring: Structured modular wiring with explicit safety ground. No special wiring needed for reverse sections and no need to re-wire pickups on steam locos. High current conductors handle only local max current so there is no voltage over peak scale voltage. Track current is generally confined to booster wiring. Opto-isolated boosters are not needed. Power supplies can be shared among multiple boosters
Cons of Direct Home Wiring: It may be unfamiliar to modelers who have built layouts in the past. Detection sections on existing common rail layouts may need to be reorganized. A few more gaps to cut.
Remember, no matter how you control your trains, you should always use safe wiring practices. |
 Programming Track: For Programming Decoder CVs
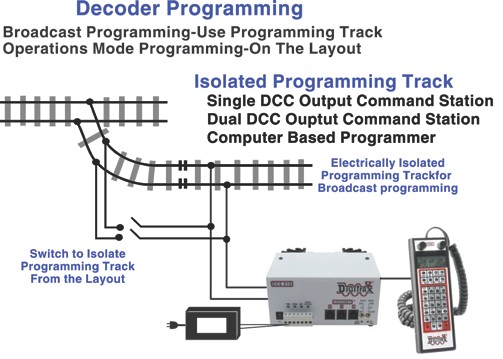
There are several ways to program your decoders. All Digitrax Command Stations have built in programmers that send programming information as a broadcast message to any decoder on the layout. Digitrax advanced sets can also send programming information to specific loco addresses on the layout, this is called operations mode programming. With Digitrax decoders and command stations, you can change ALL CVs using Ops mode programming. With other systems, you are not allowed to change a locomotive's address with ops mode programming.
When you are sending a broadcast programming message, the decoder equipped locomotive that you are programming must be placed on an isolated programming track. This lets you program individual locos without changing the programming of other locos on the layout.
This diagram shows how to set up a programming track. To program decoders on the programming track:
- Run the decoder-equipped locomotive you want to program onto the programming track.
- Throw the switch to shut down the rest of the layout. (If you are using a command station with two DCC outputs like the DCS210 or DCS240, you can continue to run the layout while programming.)
- Set your command station to program mode and program the decoder.
- When you are finished programming, change the command station back to run mode and switch the layout back on and run the locomotive on the layout.
Another programming option is a computer based programmer like the PR3Xtra ($84.95 msrp). With this option it is easy to program loadable speed tables by drawing the speed curve you want on the screen and pressing the enter key! You can even save programming information from one locomotive and put into other locos later. PR3Xtra also is used to program Digitrax sound decoder projects and to update firmware in some Digitrax products. Programming software is included with the PR3.
Is It Hard To Install The Decoders?
Now that DCC has been around for many years, decoder installation is much simpler than it used to be! Today’s decoders are smaller with higher current capacities. Many locomotive manufactures build locos with circuit boards that can be swapped for decoders making installation simple. Locomotive manufacturers are building locomotives DCC ready locos with sockets that are ready for a decoder to simply plug in. There are more and more DCC equipped and sound equipped locomotives on the market every day. All of this makes installation much simpler than it used to be!
DCC ready means that provisions have been made inside the loco to allow for easy decoder installation, the loco usually has a socket or other arrangement for plugging in the decoder of your choice. Most new HO locomotives are DCC ready or DCC equipped. All DCC decoders do not fit all DCC ready locos, so be sure to purchase a decoder that will fit the specific loco you are converting.
DCC equipped means that the locomotive is factory equipped with a DCC decoder. This is great for beginners who are afraid of decoder installations or if you just need the basic features in a DCC decoder. If you are interested in advanced decoder features like real FX effects, transponding and scaleable speed stabilization, check before you purchase a factory equipped locomotive to be certain that it has the features you want. In most DCC equipped locos are also available as DCC ready so that you can install exactly the decoder you want without having to pay extra for a decoder that you will replace anyway.
Plug n Play means that a particular decoder is designed to simply plug in to a particular locomotive. In some cases they replace the factory-installed circuit board inside a loco. Plug n Play decoders are available for N-scale, HO scale and some larger scale locos.
Of course, there are still many locomotives out there that will require you to solder wires to do the installation. In N-scale you may need to mill the frames to make room for decoders and speakers, if you are installing sound, in some locos. In some cases, you can simply modify the weights in a loco to make space for a decoder.
For installations in steam locomotives, you’ll want to consider installing the decoders in the tender where there is usually more room. Sound is another issue that many steam operators want to incorporate in their operation and this requires even more room inside the locomotive because of the need to install a speaker, too.
In G-scale locomotives, there is almost always plenty of room inside to install DCC decoders and sound units, too. It is usually easy to see where the wires to and this makes large-scale installation easy. Beware that large scale locomotive manufacturers often don’t follow any wire color conventions when they build the locomotives so, it will be important for you to closely examine your locomotive and determine “which wire does what” before you start your installation. Unfortunately, many large-scale locomotives are weatherproofed and were not made to be taken apart so, getting the locomotive disassembled is often the biggest challenge you will face in large-scale installations.
Steps for Successful Decoder Installation
- Read the instructions and plan the installation.
- Choose a locomotive that runs well on regular DC.
- Choose the appropriate decoder for you installation.
- Test the decoder before installation.
- Carefully disassemble the loco.
- Isolate the motor!
- Follow the wiring diagram or instructions for your decoder.
- Test the installation first on DC then on DCC.
- Customize your decoder's performance characteristics by programming selected CVs.
- Read the instructions and plan the installation
Digitrax provides instructions with all decoders. Some decoders have very specific instructions because they are intended for use in specific locomotives. Other decoders have more general instructions because they are used in a wide variety of locos. Check our website for specific decoder installations if you are working with a loco that is not specified in the instructions. - Choose a loco that runs well on regular DC
Take a close look at the operation of the locomotive you want to convert when it is running on regular DC. Installing DCC decoders will not improve the mechanical operation of your loco! Before you install a decoder is a good time to audit the mechanisms and give it a good tune up (since you already have the shell off). Be very careful when you take you locomotive apart; don’t lose any of the little parts that tend to fly off in every direction. If you decide not to install a decoder in a given engine but plan to run it on a DCC layout do the tune up anyway. - Choose the appropriate decoder for your installation
Digitrax provides lists of recommended decoders for particular locomotives on our web site. Some decoders are made to fit specific locomotives and their packaging indicates which loco they will fit. If you can't find a recommended decoder for your particular installation, follow these steps to be sure you choose an appropriate decoder for your installation.
- Check the Stall Current of the Motor
If the motor's stall current exceeds the decoder's rating you are sure to have problems down the road so, start by using the following procedure to check the stall current of your motor.
- Put the locomotive without the shell on a regular DC track.
- Attach a DC current meter (ammeter) in series with one of the track feeds. Some power packs that have ammeters are really ideal for this test.
- Apply 12V DC power to the track for N or HO. (16V for G)
- Hold the flywheel or drive shafts to stop the motor from rotating for a couple of seconds.
- While the motor is stalled, measure the current that the unit is drawing from the power pack. Be sure that while you are taking the measurement that the power to the track remains at 12V (16V for G scale) to get an accurate measurement of stall current.
- Use the manufacturers' recommendations to choose the appropriate decoder for your application.
Generally speaking, N-scale engines with can motors draw about one amp; HO engines with can motors draw about one amp. Older Athearns with open frame motors and Bowers with Pittman motors draw around 1 3/4 amps. Large scale engines (O, S & G) vary in current draw and some even have two motors, those with can motors may draw less than 2 amps but each should be tested individually to determine which decoder to use.
- Check the Stall Current of the Motor
- Test the decoder before installation
Test each DCC decoder before installation. Digitrax includes a basic test device, the LT1 with all starter sets. You can also build your own decoder tester or purchase one of the commercially available models. Every Digitrax decoder is tested before it leaves the factory but we still recommend that you do this test for your own peace of mind. If you have tested the decoder in a controlled environment before proceeding with installation and there is a problem later in the installation, you will know that you should check the locomotive for problems (like failure to isolate the motor). If you are a first time installer, this procedure will have the added benefit of familiarizing you with the decoder wiring before you do the installation. - Carefully disassemble the loco
As you take you loco apart, be sure you identify all the parts and how you will need to reassemble them. Many locos come with "exploded" diagrams that are helpful when you start putting the pieces back together. - Isolate the Motor
For DC permanent magnet powered locomotives, the decoder must be electrically inserted between the track power pickups and the motor brushes. The most important part of any successful locomotive conversion is proper electrical isolation of the motor brush connections, so that they are driven exclusively by the decoder circuitry.
Note: Failure to isolate the motor will damage the decoder. Once the motor is isolated, follow the wiring diagram or decoder instructions for installing the decoder.
Special note: If you are using a loco with an ironless core motor such as a Faulhaber motor, check with the decoder manufacturer for additional steps that are necessary for this type of installation. - Follow the wiring diagram or instructions for your decoder
Once you have chosen the right decoder and tested it, it's time to check the installation instructions and decoder wiring diagram again. Pay particular attention to the decoder wiring diagram. Be sure you know the purpose of each wire and can identify where it should be soldered to the locomotive. In general decoders follow the same standard recommended wiring colors, but it’s always best to check just to be sure.
Note that several different types of light bulbs and LEDs are used in locomotives and some lamp installations will need to have current setting resistors added to the installation to prevent the bulbs from burning out or damaging the decoder. Be sure to follow the manufacturers’ instructions concerning light installations. - Test your installation on DC and DCC
Once you have completed the installation, test the locomotive with decoder installed to be sure it runs properly on first DC and then DCC. Select the locomotive on your throttle, run it in both directions, turn the lights on and off and try out any other functions you installed. - Customize your decoder’s performance characteristics by programming selected CVs
Refer to your manufacturer’s instructions for programming the various CVs to set up your decoder to run the way you want it to. If you are just getting started, it is probably a good idea change the address right away but to run your locomotive in the default settings for a while. This will allow you to learn how to operate your system and become comfortable with all the new variables you have control over. Later you can go back and change acceleration, deceleration, speed curves, etc. - No Worries Warranty=Peace of Mind
If something goes wrong when you install a Digitrax decoder, you are covered by Digitrax No Worries Warranty for one year from date of purchase. If it is defective or if you make a mistake, just fill out the form on our website, attach a copy of your purchase receipt and send it to us for repair or replacement at no charge. If something goes wrong after the warranty period, we will still repair or replace your decoder for a small repair fee. Check our website for current information on repairs. Not all warranties are this simple and straight forward so check to be sure.
Decoder Programming-Setting up Decoder Performance Characteristics
Each decoder installed in your locomotives can be programmed to have its own unique performance characteristics. When you program decoders, the command station sends programming information to decoders and the decoders store that information for future use. You don't have to open up the locomotive to program decoders. Just press a few keys and you're ready to go. Each decoder can have a different set of performance characteristics and the decoder “remembers” its programming until you change it.
Configuration variables, also called “CVs” to set up various operating characteristics in decoders. Think of these as pigeon holes where you store information about how you want the loco to perform each characteristic available. See the table below for a description of the most commonly used CVs. The table tells you the CV number and what it is used for with a brief description of how to use the CV to set up a given loco's performance characteristics.
All Digitrax decoders come from the factory with all CVs set to default values that will allow you to run the locomotive on 2 digit-address 03. Once the decoder is installed and tested using the factory set CVs, most Digitrax users start off by reprogramming the decoder's address (CV01 for two digit addressing or CV17 & CV18 for four digit addressing) and the configuration register (CV29) if necessary. The decoder address is the unique number that will be used by the system to send commands to that decoder. The configuration register sets up the decoder for: 14, 28 or 128 speed step operation, analog mode conversion on or off, loadable speed table on or off, 2 digit or 4 digit address and the normal direction of travel.
Most Commonly used CVs by Digitrax Decoders
|
CV # |
Used For |
Notes |
|
CV01 |
Address |
2 digit addresses 01-127 |
|
CV02 |
Start Voltage (V-start) |
Used to trim the locomotive to compensate for its motor efficiency. The higher the start voltage, the higher the locomotive's initial speed when started. |
|
CV03 |
Acceleration Rate |
Acceleration is the rate at which the decoder increases speed from one speed step to the next in response to a new increase speed command from the system. Acceleration rate can be used to simulate train weight. |
|
CV04 |
Deceleration Rate |
Decelerationistherateatwhichthedecoderdecreasesspeedfromonespeed step to the next in response to a new decrease speed command. Deceleration can be used to simulateinertia. |
|
CV05 |
Max Voltage (V-max) |
Sets maximum voltage to be applied at the top speed step. Use V-Max to limit the top speed of your locomotives. |
|
CV06 |
Mid Point Voltage (V-mid) |
Adjusts the throttle response curve at speed step 15 |
|
CV13 |
DC Functions ON |
Set up decoder functions to remain ON when decoder is running on DC track |
|
CV17 |
Address-4 digit (hi) |
4 digit address-0000-9000+ It takes two CVs to set up a 4 digit address. |
|
CV18 |
Address-4 digit (lo) |
These can be programmed together with Digitrax command stations. |
|
CV19 |
Consist Adr |
Advanced consist address for use with advanced consisting method |
|
CV29 |
Configuration Register |
Sets up the decoder for: 14, 28 or 128 speed step operation analog mode conversion on or off loadable speed table on or off 2 digit or 4 digit address normal direction of travel |
|
CV49 |
FX F0 Fwd |
Digitrax FX effect set up for the forward light lead F0F (white lead) |
|
CV50 |
FX F0 Rev Light |
Digitrax FX effect set up for the reverse light lead F0R (yellow lead) |
|
CV51 |
FX Function 1 |
Digitrax FX effect set up for Function 1 (green lead) |
|
CV52 |
FX Function 2 |
Digitrax FX effect set up for Function 2 (violet lead) |
|
CV53 |
FX Function 3 |
Digitrax FX effect set up for Function 3 (brown lead) |
|
CV54 |
FX Function 4 |
Digitrax FX effect set up for Function 4 (white/yellow lead) |
|
CV55 |
Static Compensation |
Scaleable Speed Stabilization "stiffness" |
|
CV56 |
Dynamic Compensation |
Scaleable Speed Stabilization "shock absorber" |
|
CV57 |
Droop |
Scaleable Speed Stabilization controls speed loss as load is increased |
|
CV61 |
Headlight/Motor |
Sets up directional headlight operation and split field motor operation |
|
CV62 |
FX Adjustment |
FX Rate and Keep alive adjustment |
|
CV63 |
FX Ditch Light Hold |
Ditch Light Blink hold time |
|
CV65 |
Kick Start |
Set up a brief pulse of power to be sent to the motor to get it moving |
|
CV66 |
Forward Trim |
Adjust loadable speed tables up or down in the forward direction |
|
CV67- CV94 |
Loadable Speed Table |
Loadable Speed Table Entries |
|
CV95 |
Reverse Trim |
Adjust loadable speed tables up or down in the reverse direction |
Locomotive Speed Controls
Because Digitrax is a digital system, locomotive speeds are defined by discrete speed steps. The DCC “standards” specify 14, 28 or 128 speed step control. 14 and 28 speed step control offer reasonably good speed control and some non-Digitrax systems only support 14 or 28 speed step operation. Because of this, Digitrax decoders support 14 & 28 speed step operation. Digitrax prefers the superior speed control that you get with 128 speed step operation so, all of our decoders and command stations are set up for 128 speed steps. If you are using Digitrax decoders with systems that do not support 128 speed steps,
you can simply reprogram the decoder to work with 14 or 28 speed steps. If you are using a non-Digitrax decoder that is not capable of 128 speed step operation, you can still run them on Digitrax systems.
Why do we need more speed steps to control our models, the real thing only has a few "notches"? It's true that most prototype locos have just a few speed notches on their throttles but they also have control over braking to adjust their speed. In the model world we use electricity from the track to control motors inside the locos and we don't have brakes on our models so, we need more resolution in our throttles to achieve the appearance of prototypical speed and motion. In general, a larger number of speed steps will give you more prototypical looking motion and better speed control of your model trains.
The Throttle Response Curve
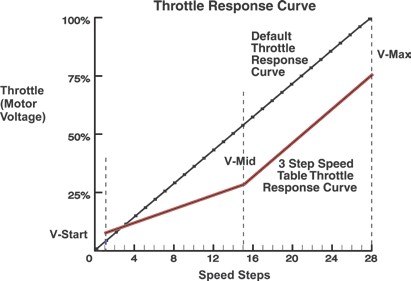
It’s easy to confuse the throttle response curve with acceleration & deceleration. The throttle response curve is the relationship of the motor voltage (throttle setting) to the speed step command sent by the command station. Acceleration and deceleration are the rate of change from one speed step to the next, either up or down.
 Easy Three Step Speed Table
The default throttle response curve is a straight line from stop to maximum speed. Because locomotives don't really accelerate this way, you can set up the throttle response curve for each loco to simulate prototypical train motion. The diagram at the right shows the default speed curve and how you can use V-start, V-mid & V-max to make it more prototypical. V-start is set with CV02, v-mid is set with CV06, and v-max is set with CV05. This is a simple way to improve the loco's response to the throttle.
Loadable Speed Tables
You can use a loadable speed table to more precisely set up a throttle response curve. Loadable speed tables let you define the voltage applied at each individual speed step for a given locomotive by setting values in CV67 through CV94. Once you have defined the speed curve you like, you can use the forward trim (CV66) and reverse trim (CV95) to move the curve up or down in speed. Setting up a loadable speed table involves setting many CV’s since you will set a value for each of 28 speed steps. Many users find that using a computer based programmer makes this process much easier. When you use a computer, you can even save the speed tables you like and load them into other decoders quickly and easily via the computer.
Speed Stabilization (Back EMF)
Some people call speed stabilization "cruise control" for your locomotives. Speed stabilization is also called back emf or load compensation. Some non-Digitrax decoders offer a simple form of load compensation that lets you set a speed for your locomotive and have it run at that speed “up hill and down dale” regardless of load. This is fine as long as you are running one locomotive by itself. When you try to run locomotives in a consist using simple load compensation, you can have the "pushy pusher" problem. In this case, the helper or trailing locomotive has a set speed that it is determined to maintain, no matter what the lead loco is doing. As the train moves up a grade, the lead locomotive maintains its speed while the helper also maintains its speed and the cars in between often wind up on the ground. Digitrax offers decoders with scaleable speed stabilization to address these problems. Scaleable speed stabilization lets you configure how the loco reacts to back emf information so that you can solve the pushy pusher problem. Scaleable speed stabilization is really the ultimate in low speed control since you can use it to smooth out low speed operation of reluctant mechanisms. CVs 55, 56, & 57 are used to set up scalable speed stabilization.
Digitrax SoundFX Decoders
Some say that sound is the most subjective of all the senses. Everyone hears things differently. So, Digitrax created SoundFX customizable downloadable sounds. Using a sound definition language, you can make your sound decoders sound just the way you want them to sound. Digitrax SoundFX Decoders come ready to run, pre-loaded with one or more sound projects selected by Digitrax based on how the decoder will be used most often by our customers.
Unlike other sound decoders, Digitrax decoders can download new sound project files. This means that you can buy any SoundFX decoder and change the sound that is plays. You can download projects from the Sound Depot on www.digitrax.com or you can build your own sound files from recordings you have made. You can also tweak the standard projects to change the bell, whistle and other sounds included in a sound project file.
Sound decoder performance is very dependent on the speaker installation in the locomotive. For the best sound, we recommend that you use a speaker that is built for the output of the particular decoder you are using and that you install it with an appropriate sound enclosure to get the best sound from your investment.
Beyond the Basics with Digitrax Complete Train Control
Your Digitrax Starter Set is just the beginning. There are many additional options available above and beyond basic train control. We will cover a few of these items just to give you an idea of the possibilities. Optional equipment like accessory decoders for turnout and other accessory control, automatic reversing boosters and devices, power management devices to improve layout operation, radio & infrared control to give you more freedom, detection devices for position reporting, transponders and transponder detectors for locomotive id and position reporting, computer based decoder programmers, computers and software to automate the layout and more can add new dimensions to your model railroad.
The possibilities with Digitrax Complete Train Control are nearly endless. New products are being developed at a rapid pace so if there is something you wish your layout could do, there will probably be a way to do it with Digitrax before too long.
Accessory (Stationary) Decoders-Control Turnouts and Other Layout Accessories
Control stationary accessory devices like turnouts. Digitrax offers several different stationary decoders. All of these are LocoNet devices that are automatically connected to the system via LocoNet with no additional accessory bus required.
The DS64 Quad Turnout Decoder ($59.99 msrp) for accessory control. DS64 can control 4 outputs for either snap switches or slow motion turnout motors. It also has 8 inputs that can be used for feedback on LocoNet. DS64 can be used for turnout control as well as block detection, local route control, positive turnout position feedback, signaling system control messages, local animation control and cascaded route & turnout control.
The DS44 is a no frills stationary decoder for use with 4 slow motion turnout machines. It retails for $39.99 msrp. The DS52 stationary decoder controls 2 turnout machines, either slow motion or solenoid for $24.95 msrp.
The SE8C signal board can also be used to control turnout machines as well as signals. ($125.00 msrp).
 Handling Reversing Sections
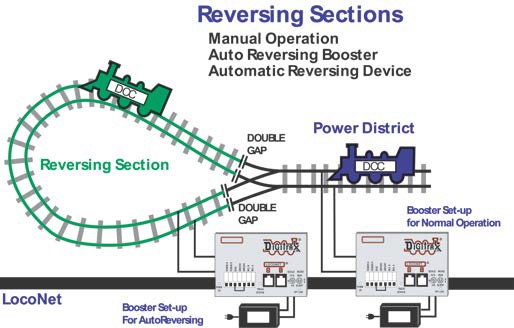
You can operate reverse sections manually or automatically with Digitrax. Just like with DC, both ends of the reversing section must be double gapped. For manual operation, power the reverse section separately and use a toggle switch or relay to handle the polarity change as the locomotive enters and leaves the reversing section. For automatic reversing, power the reverse section separately and use an auto reversing
booster or other auto-reversing device to handle the polarity change. DCC equipped locomotives will not change direction when the polarity change occurs, they will continue at the speed and in the direction commanded. If you are running analog engines, they will reverse direction because they “see” the polarity change and respond to it.
To set up auto reversing, you will need a booster and an auto-reversing device. This can be another booster set up for auto reversing or an auto-reversing device such as the AR1 ($29.99 msrp) for a single reversing section or a PM42 ($79.95 msrp) for power management and/or auto reversing in four sections. The first booster provides a "system reference" and the auto reverser checks the polarity of the reversing section against this system reference to determine when it needs to change the polarity to allow continuous operation. You can run more than one reversing section on a single auto-reversing booster as long as only one auto-reversing event occurs at a time. The PM42 can handle up to 4 auto-reversing sections. Remember that some non-Digitrax auto reversing devices require you to make changes to locomotive wiring where the pickups are not “side by side” on the locomotive. This is an issue in many steam locomotives where one power pickup is on the locomotive and the other is on the tender.
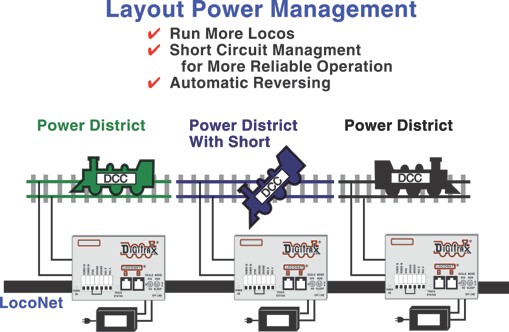 Power Management with Digitrax Complete Train Control
Even though traditional blocking is not required for train operation with Digitrax, dividing the layout into power districts is used for the following power management reasons:
- To provide additional power to operate more locomotives than one power supply can handle. For example, a 5 amp booster and power supply will operate between 6 and 10 average N-scale locomotives, between 4 and 6 HO locomotives and 2 to 4 G scale locomotives. You can run more locomotives by dividing the layout into power districts and adding more boosters and power supplies. For large-scale operations you can also use higher current boosters to deliver more power to individual sections if
needed to run more trains. Just a note about boosters and current ratings: most boosters will require an external fan in order to output the stated maximum current for extended periods of time. This is not an issue for most modelers but if you experience booster shutdown, you should consider adding fans to increase heat-sinking capability. - Short circuit management to prevent total layout shutdown when shorts occur in any given power district or sub-district. If a short occurs in one district or sub-district, only that area of the track shuts down, the rest of the layout keeps operating. The reason for this is that all of the boosters are linked to the command station and will continue to receive the DCC signal and output it to their own power district.
Duplex Radio and Infrared Wireless Control
Digitrax gives you the option of using duplex radio and/or infrared throttles and transceivers/receivers on your layout. You can use both technologies individually or together on any layout. This means that if you have a UR90 & UR92 on your layout, your operators can operate any Digitrax Duplex or Infrared throttle all at the same time. Older simplex radio also works together on any layout with duplex and infrared.
Digitrax Duplex Radio gives you complete freedom to run your layout without plugging in. Once you have joined the duplex network, you’ll be free to select, program and run locomotives and turnouts from your throttle. Digitrax Evolution Starter Sets are available in Duplex equipped versions. Or you can add Duplex to your existing Digitrax railroad by simply adding a UR92 Duplex transceiver and Duplex throttles (these have a “D” at the end of their part number). Existing DT400 and UT4 and later model throttles can be converted for Duplex operation to keep the cost down. Simplex radio throttles can be converted to duplex as well.
Note that the “D” throttles communicate with the UR92 and NOT the UR91. Note that the “R” throttles communicate with the UR91 and NOT the UR92.
This means that if you plan to run both types of radio throttles together on a layout, you will need BOTH the UR91 Simplex receiver AND the UR92 Duplex transceiver. Simplex production has ended and UR91 and R throttles are no longer available for sale.
All Digitrax handheld throttles have infrared capability built in; you just have to add infrared receivers (UR90 $45.95 msrp) around the layout to be able to use IR. Since IR is line of sight, you will probably need more than one UR90 to cover a medium to large sized layout. UR92’s also have infrared capability so that they can be used with infrared throttles, too.
Detection and Transponding
Digitrax uses LocoNet to give real time feedback from basic detection devices. With BD4 ($29.95 msrp, use with DS64) and BDL168 ($149.99 msrp for 16 detection sections) you can set up your layout to detect locos, cars and caboose’s resistor wheel sets and to send feedback to your system. This information can be displayed on a control panel or used by a computer program. This kind of detection can be used to generate and display basic signal aspects.
But, what happens when the computer or other control device loses synchronization with the layout? For example, what if Engineer Joe picks up a loco and moves it? Now we have no absolute certainty of the location of that rolling stock. This is where train identification becomes useful to know the location of a specific loco on the layout with real time feedback. With train identification and detection, the system can stay synchronized and give more reliable detection. Digitrax uses transponding decoders, devices, and detectors to handle this. Transponding is included in all current production Digitrax decoders. Transponding can be added to existing decoders and decoders made by other manufacturers by adding a small transponding device. By adding RX4 transponder detectors ($49.95 msrp) to existing BDL168s you can set up 4 transponder detection zones. Of course you can have multiple BDL168s and RX4s on the layout to create a comprehensive detection and train identification system for your railroad.
Computer Applications
Digitrax offers the PR3Xtra computer interface that lets you interface your layout operations with your computer and program sound and regular decoders using computer software. It's easy to program decoders using the software provided. If you are programming Digitrax SoundFX decoders or setting up loadable speed tables, the PR3 is the best way to go!
What Are The Most Common Problems With Digitrax Complete Train Control?
- Deciding to take the plunge and purchasing a starter set and some decoders. There is a lot of information out there and you will try to read it all. Once you get over the information overload and settle on a system, half the battle is won!
- Fear of decoder installation. Start with decoders that are either pre-installed or plug n play. For your first wired installation, choose one that is straightforward. Learn from other modelers, you might even pay someone to install a decoder for you and then learn from that installation.
- Layout wiring problems. Before you install your Digitrax system, be sure that the layout runs up to your standards with regular DC. If the trains won't run everywhere on the layout with DC, you won't do any better with Digitrax or any other form of command control.
- Reading the manuals. Manuals are notorious for being hard to read. The trick is to do it in small doses. Start with the "quick start" section and follow it exactly, preferably on a small loop of track that has no wiring issues.
- Troubleshooting. When you encounter a problem with your system don't automatically assume that your Digitrax equipment is the problem. Look carefully at what was going on before the problem occurred. Determine what changed and "un-change" it if you can. Try to isolate the problem and make notes so that you can describe the problem correctly and completely to your dealer or customer support representative. The Digitrax Help Desk is your portal for support. Register and put in a ticket describing your issues. This system lets you refer back to your prior tickets, too! Our website has comprehensive information on all of our products including downloadable manuals and tech support articles through the Tech Support Depot. We also have a YouTube Channel where you can watch videos on the questions we get most often. Whatever you do, don't suffer in silence, ask for help! The rewards of running Digitrax on your layout are really worth the trouble.
Learn More about Digitrax Complete Train Control
Digitrax web site is www.digitrax.com. It is a complete portal that will help you learn about Digitrax. Our web site includes information about all of our products and how to use them. It also has a decoder selector to assist you with choosing the best decoder for a particular loco installation. You can download the latest instruction sheets for your products. You can search for a dealer near you where you can see a demonstration. The Digitrax Tech Support Depot is a searchable tech support and information database will help you learn more about Digitrax. Our YouTube Channel provides videos that are very helpful. We also have a mobile App that lets you access tech support information from anywhere you have phone reception. You can learn about our No Worries Warranty and what to do if you ever need warranty or repair service.
Visit your local hobby shop and ask for a demonstration. You can also see demos at many local train shows and at local area layouts. Also, feel free to contact Digitrax through our Help Desk at helpdesk.digitrax.com, it’s the mose efficient way to get the answers you need.
So what are you waiting for?
Fear of decoder installation and wiring?
Check out plug n' play and other simple installation options. Have your local dealer do an install for you while you watch.
"I have 200 (or more) locomotives." How many of those locos do you usually run at one time now? The answer for most people is fewer than 10. So, convert the locos you use most often and do the rest over time. You can always run an analog loco without a decoder on your Digitrax system, too.
"Something better might come along." With Digitrax when that something better does come along, you can add it to your existing system. The Digitrax system is engineered to be expandable for the future.
Information overload. There is a lot to learn about Digitrax and DCC but you can start out with the basics and add more features later.
"It costs too much." Compared to the cost of traditional block wiring on a large layout, DCC is surprisingly affordable. With decoders priced under $20.00, you can afford to equip your entire fleet.
"I'll never be able to understand how it works." Once you have done the basic system set up, you will understand how to run the system. The more often you use it, the more comfortable you will become with the system (this is much the same as learning to run any layout control system). You don't really have to know all the technology behind how the system works unless you just want to, Digitrax has already sweated those details for you.
Digitrax CompleteTrain Control
will make your layout more fun!
Digitrax, Inc.
2443 Transmitter Road
Panama City, FL 32404-3157
www.digitrax.com
helpdesk.digitrax.com
©2016 Digitrax, Inc.