1) Connect the Red and Black track wires from the 9 pin Track and Function harness to the locomotive track power connections.
2) Connect the function leads that are to be used from the 9pin Track and Function harness. Note that to be able to readback Sound FX CV's a combination of function lead loads of at least 60mA at 12volts should be connected to these function leads. Insulate the unused function leads so they cannot short to the locomotive frame or track power.
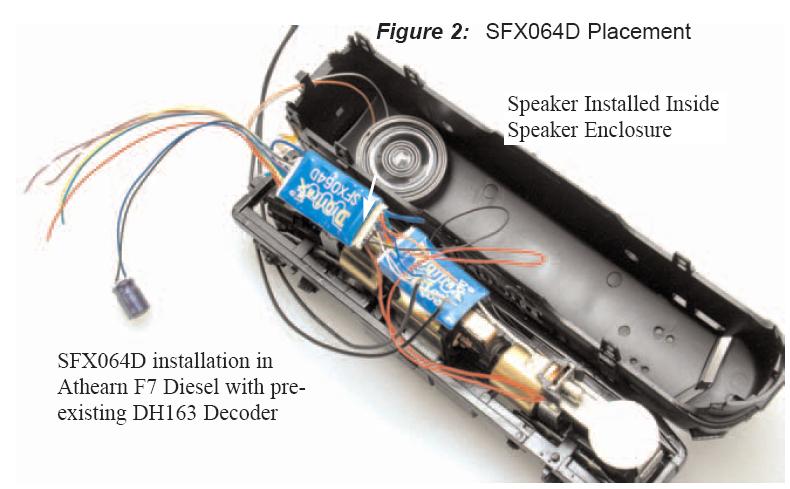
3) Mount the 28mm speaker attached to the 10pin sound feature harness in an appropriate sound enclosure. Be sure to inspect the speaker diaphram for magnetic debris or damage, which will affect sound quality. Other speakers may be subsitituted in combinations as long as the total impedance on theOrange/Gray wires of the 10pin sound connector is greater than 8ohms.
4) Mount the 330uF/25V electrolytic energy storage capacitor from the 10pin sound harness. Be sure not to short the capacitor case or leads to the track leads or locomotive frame or damage to the decoder may result.
5) For Steam units with a synchronization cam capability, connect the White CAM lead of the 10 pin sound harness to the cam output connection.
6) Inspect the installation before testing the sounds and replacing the shell.
7) Connect DCC track power from a compatible DCC system and select the factory default address 03 to enable sounds for testing.
8) Be sure F8 is OFF, and then press F1(bell) or F2 (whistle/horn) ON to hear these associated sounds.
9) Customize sounds by programming Sound CV's to adjust the desired configurations, as shown in the tables of Sound FX CVs. Sound schemes other than the default Steam (CV60=0) or Diesel (CV60=1) schemes may be loaded by using a Digitrax PR2 Sound FX Programmer.