Prior to Disassembly
Test the Decoder All Digitrax decoders are tested for proper operation before they leave the factory, but sometimes strange things happen. Therefore to insure your decoder is covered under our warranty policy, please give it a thorough test BEFORE you cut the wires.
Test Run the Locomotive
Be sure it runs correctly in both directions with no unusual noises or binding in the motor-gear train.
If it checks out OK, then:
Get Ready
Before you start, get your tools and supplies together for this project. You will need the following items:
- DECODER TESTER - Such as the one that came with your Digitrax system or any other RELIABLE DCC decoder tester.
- TWEEZERS - Small sharp pointed
- HOBBY KNIFE
- WIRE CUTTERS
- SMALL PLIERS
- SMALL PHILLIPS HEAD SCREWDRIVER
- FILE - Medium size, fine tooth
- SMALL SOLDERING IRON AND SOLDER
- SMALL RULER
- PARTS LIST - The one that came with your locomotive.
- PARTS CONTAINER - Something to keep the parts in so the won't get lost. The box the locomotive came in or a small zip top bag will work fine.
- MARKER PEN - One that will mark on metal and plastic.
- FINE SANDPAPER OR EMERY BOARD
- A DAB OF 'GOO'
- And, of course, the locomotive
Please Note: This installation will not allow you to keep the headlight feature, however you will be able to retain nearly all of the weight of the locomotive which is very important with a locomotive of this small size.
Disassembly
Put ALL of the parts into your parts container as they are removed in the following steps. Referring to the parts list and disassembly instructions that came with your locomotive, gently pull out the top ends only of the hand rails on both sides of the cab rear door. While gently rocking the cab, pull it straight up and off. Remove the weight found inside the cab. Remove the plastic fuel tank cover by pulling it straight away from the frame. Grasp the frame in one hand and the walkway/shell combination in the other and carefully pull the two apart. The trucks may now be removed by rotating slightly and lifting them out. (They will practically fall out at this point.) Pay attention to their orientation with respect to the frame in order to reassemble them properly later. Remove the plastic screw head covers and the screws holding the frame halves together. Remove the small printed circuit light board and the two insulating frame separator/spacers. Very important: Before removing the motor, make a PERMANENT mark on the TOP of the motor so you will know which wire to connect where and how to re-install it. Snap the motor carefully out of its plastic mounting frame. You will find a small phosphor-bronze contact tab at each motor brush cap. With your pliers, grasp the tab and pull each one straight out from under the brush cap. Be careful not to bend them, as they will be used in another manner later. Inside the brush caps are the carbon brushes and small delicate springs. CAREFULLY grasp the brush caps with your pliers and gently pull them straight out from the motor. They are "snapped" in place and a slight rocking while pulling motion will free them. Do this carefully so as not to loose the small springs inside nor to bend the cap out of shape. Believe me, the springs are nearly impossible to find if they hit the floor!!! Be sure all of the parts except for the frame halves are in your parts container and close it up.
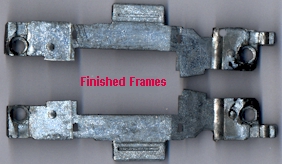
Frame Modification
Wiring and Assembly
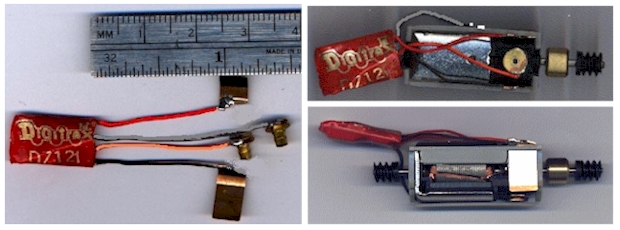
Take the screws and nuts out of the frame halves and remove the motor from it's mounting clip. Install the brush, spring and cap attached to the GRAY wire in the bottom brush opening of the motor. Keep it against the frame and out of the way of the motor worm gear and out of the way of the truck gears with a dab of 'goo' (later). The GRAY wire is routed through the end of the motor mounting clip and beside the motor shaft to the top side of the locomotive. Clip the motor back in it's mounting clip.
Install the ORANGE wire, remaining brush cap and brush and spring in th top motor brush opening. Be sure there are no wire "whiskers" that could contact the locomotive frame. Wires can be "shortened" after assembly by rotating the brush cap to take up a bit of the slack. Reassemble the motor, mounting clip, insulating separators and frame halves with the two screws and plastic nuts. SNUG BUT NOT TOO TIGHT!!!
Slip the phosphor bronze clip with the RED wire attached down between the plastic part of the motor and plastic motor mounting clip. The end of it will contact the right metal frame half (engineer's side) when assembly is complete next to, but not touching the brush cap. Install the clip with the BLACK wire similarly on the left (fireman's side). Be sure there is no contact between either of the brush caps, their wires nor metal parts of the motor and either of the clips attached to the RED and BLACK wires or you will have SMOKE!!!
In the corner where the GRAY wire is routed, use a toothpick to place a small amount of adhesive (Walthers "GOO" or similar) to hold the GRAY wire in position away from the gears and motor shaft. When the adhesive has thoroughly dried, rotate the trucks back into their respective, properly oriented positions. Check that there will be no interference between wires and parts of the locomotive frame, motor and shell and then place the locomotive shell and walkway back in place. Be careful with the metal contact parts on the bottom of the walkway getting back into proper position with the electrical contacts on the trucks. These metal parts are easily broken off from the shell and difficult to reattach! (Voice of experience)
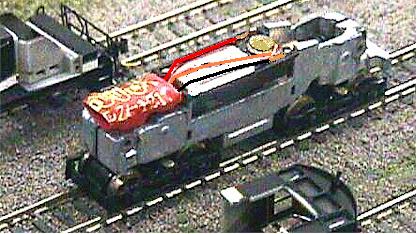
Test Run
Place the locomotive on your DCC track and check that it runs OK in both directions with no binding or unusual noises. (Due to the track power pickup configuration, it won't run without the shell in place!) If all is well, put the weight and cab back in place and enjoy.