Product Support for: Accessories -> 3 Pack Card Edge Connector (CARDEDGE CON 44)
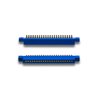
View the Product Page for the CARDEDGE CON 443 Pack Edge Connector for use with PM4 Series Boards, BDL16 Series Boards and SE8 Series Boards
This is a replacement part that can be ordered through your dealer. Digitrax does not repair this item or sell directly to end users.
27 Articles Found for CARDEDGE CON 44
Do you have a recommend wiring procedure for the 44-pin edge connector on the PM42 and SE8C?PM42, PM4, BDL168, BDL16, BDL162 & SE8C use a 44-pin edge connector. Connecting wires securely to this connector requires soldering skills. For connections to the 44 pin connector, Digitrax recommends using 16 gauge stranded wire. For all other soldering connections, Digitrax recommends 14 gauge (AWI) stranded wire for electrical connections on your railroad. 1. Use individual short lengths of 16 gauge wire to connect to the 44 pin connector. 2. Strip and tin both ends of the wire. 3. Bend one end into ...
The installation will be in the tender of the Con-Cor 4-8-4 locomotive. 1. Carefully remove the tender’s shell from the frame. 2. Remove the factory installed DCC dummy plug. (See photo below) 3. Insert the DN143IP medium plug pins in the socket. Pin 1 will be the bottom right socket when viewed. (See photo below) 4. Replace the tender shell. It may be necessary to trim the underside of the tender top to allow it to snap into place. 5. You are now ready to run your locomotive. The DN143IP is factory programmed to address 03. You can easily customize ...
Application Note: Con-Cor HO-Scale Zephyr steps needed for the DZ125PS decoder installation Step 1: Carefully remove the body from the frame. There are four clips along each side of the body. (See red arrows) We have found if you start at the rear of the body with a small flathead screwdriver and carefully pry the body outward to remove the back clip, you can move the screwdriver forward to release the others. Once the body is completely removed, carefully lift the light board from its holders on the bulkheads. (See blue arrows) Be very careful as the pins that hold ...
My question is: How do I mount the PM42? Do I need a special housing in order to mount it under table? It appears to me that mounting it flush against a surface would prevent, or make it extremely difficult, to attach the 44-pin connector. Digitrax manufactures three devices which have a 44-pin connector. These are the BDL168 (and its predecessor the BDL16), the SE8C and the PM42 (and its predecessor, the PM4). These best approach to mounting these devices is to screw the connector directly to the wiring panel board. Drill mounting holes in the end of the 44-pin ...
Application Note: Steps needed for installing the DN143IP mobile decoder into the Con-Cor N-Scale Aerotrain "DCC Car". The image above shows the “DCC Car” for the N scale Con-Cor Aerotrain, which is the 1st car behind the loco. It shows the holes in the underbody, above which a speaker can be mounted for a sound decoder installation. The recommended Digitrax sound decoder would be our SFX0416, but to use this decoder the seats will need to be removed. There is a pocket that is 16mm wide, 36mm long and 3mm deep designed for a speaker above the underbelly and under ...
The image above shows the “M-10000 Coach Car B” for the N scale Con-Cor M-10000, which is the 1st car behind the loco. If you look closely, you can see the holes in the underbody, above which a speaker can be mounted for a sound decoder installation. The recommended Digitrax sound decoder would be the Digitrax SFX0416, but to use this decoder, one or more of the seat sections as shown below will need to be removed. There is a pocket that is designed for a speaker above the underbelly and under the center section of seats. The speaker that comes with ...
BDL168 Pin Out Configuration: Notes: 1) All connector pins are paired top (component side of the BDL168) and bottom (solder side of the BDL168) except 11/M and 12/N. For 6 Amp current rating with 3 Amp connector pins, track/zone wires must be connected to both pin pairs: e.g. Zone A = pins 1 & A (See Figure below): 2) Letters G, I, O & Q are not used as pin designations on the connector. 3) Power connections should be made to a power supply dedicated to BDL168 use only. Multiple BDL168 units can be supplied by a single shared supply ...
Can a UR91 be returned and upgraded to a UR92? No. Our recommendation is that when upgrading to the DT402 throttle, the layout owner purchase a new UR92, but keep the UR91 installed for those who still have the simplex radio throttles. That way anybody can run on the layout.

Cost effective N and HO sized decoder with integral DCC medium plug
BD4 Output Each BD4 is situated between the PM42 Power Manager and the railroad. The DCC signal passes from the DCS50 Zephyr, through the Power Manager, through the BD4 to the track to the locomotive. When a locomotive (or equipped car) is present in a track segment, the BD4 also sends out occupancy information, in two ways. Occupancy Information Output LED1 The LED1 10-pin header is for testing the status of power to the rails and block occupancy with the LED indicator which is included with the BD4. The LED1 can also be used for panel indicator lights using LED's. ...
Direct Home Layout Wiring Digitrax strongly recommends direct home wiring where each power district and its booster are electrically isolated. This method of wiring has safety advantages and makes troubleshooting problems easier. In addition, direct home wiring makes detection work more prototypically. With direct home wiring, the BDL168 can determine and indicate whether any of its 4 zones is powered or not (possibly short-circuited) even when there is nothing on the rails in the detection sections. The BDL168 factory-set logic causes the detection sections to show "occupied" if the associated zone's power is off (because in this case, detection is ...
Common Rail Wiring Many older model railroads use Common Rail wiring because they were initially wired to operate with electrical toggle switches. Conversion to DCC is possible with Common Rail, but it is not recommended. Whole layout common rail is a method of wiring layouts where power districts and their boosters are electrically connected using a common rail or common power bus return wire. Whole layout common rail wiring is a disadvantage when it comes to detection systems since detectors cannot independently monitor whether zone power is on or off so they can't tell whether occupancy detection is working in ...
44 pin connectors with screw terminals were originally designed by a company called LWH3. Their products allow you to install the PM42, BDL168, and SE8C without having to solder to the 44 pin connector. The product line was sold to Accu-Lites. These products are available online directly from Accu-Lites at www.acculites.com
The installation instructions indicate that a PS14 be used to power the PM42. Is it necessary that I cut the wire from the PS14 so that is can be attached it to the 44-pin connector, or is there a male adapter available for the connection? Yes, currently you will need to cut the wire, strip the ends and solder them to the edge connector of the PM42. Please see the related articles below. Which lead from the PS14 is to be soldered to terminal 3 on the 44-pin connector and which is to be soldered to terminal C? The PM42 ...
Does your throttle say slot=max ?This means that the system's capacity to handle operating locos is full. The DCS100 can run up to 22 or 120 addresses at the same time. If you have the slot=max message, be sure that all locos that are not running are released from throttles or set DCS100 OpSw 44 to closed to increase the number of address slots available to 120. The DCS100 command station that comes with all Genesis, Empire Builder and Chief series starter sets are set with a factory default of 22 slots. So, once you begin to operate significantly more locos, you may need to ...
Connecting BD4 to an SE8C?The BD4 is a block occupancy detection device designed as an add-on device that can take advantage of the LocoNet hosting capability of the SE8c signal decoder. It is connected this way: The installation of a BD4 is relatively simple. Looking at the BD4, you will find a 5-point terminal block on one end and two (LED1 and DS1) 10-pin (5x2) headers on the other. There are three termination areas: a) The 5-point terminal block (left) is for the interconnection between the rail power source and the rails. b) The LED1 10-pin header is ...
A slot is a memory location in the command station that holds an active decoder address. The number of slots is the number of locomotives that the command station can support in operation at a time. When the available slots are filled with decoder addresses, trying to select another locomotive address to run generates the "slot=max" error code. When all the slots are full you can't select another address until one is released from the system. See Clearing your Command Station's Mobile Decoder Slots below for how to prevent this from happening.The DCS100 Command Station/Booster that is included with Super Chief Xtra and other ...
The DCS240 uses different combinations ofthe PWR, PROG, NET, TRACK STAUSand USB indicator to provide a visual indication. The indicators can show what mode the DCS240 is in as well as errors and indications. Indications Meaning PWR GREEN winking off every 3 seconds as a “Heartbeat” The DCS240 is powered on in Command Station Mode, Normal Operation Mode. PWR RED winking off every 3 seconds as a “Heartbeat” The DCS240 is powered on in Booster Only Mode, Normal Operation Mode. PWR off blinking on GREEN or RED every 4 seconds The DCS240 is in SLEEP mode. (GREEN = Command Station Mode) ...
Q: What is the basic configuration and Option Switch (OpSw) settings for each of the four sections of the PM42 when configured for automatic reverse section control? A: The PM42 is a 4 section multi-purpose device where each of the four sections can be individually configured to act as either a circuit breaker, or auto-reverse section controller or DPDT relay. When configured as an auto-reverse section controller, the PM42 adjusts the rail phasing of the reversing section it controls whenever a locomotive, or car with metal wheels, bridges the gaps between the rails of that reverse section and an adjacent non-reversing section ...
Q: I am trying to setup 4 Kato locomotives 3 SD-70MACs and 1 C-44-9, all with DN 163K1B decoders. I am using the loadable speed tables V in the programing manual that came with my Super Chief for a starting point. I have spent a few hours with limited success. Do have any suggestions that may help simplify this process? A: Because the decoders and command control system are digital, the commands sent from the command station based on the CV settings in each locomotive are always the same. It is the locomotive mechanisms that are different. Even with three "identical" locomotives from ...
How do I set up the SE8C to control semaphores? Installing Semaphore Type Signals with SE8CThe SE8C can be set up to use its 8 turnout motor drive outputs to run 8 three-position semaphore (arm type) signals using slow motion turnout control machines (such as the TortoiseTM machines) as actuators. These 8 semaphore signals are available in addition to the standard 32 LED signal heads on the 8 signal control cables and occupy a separate semaphore address control range.The SE8C automatically sequences the three possible mechanical arm positions to match 3 aspects of red, green and yellow using a position ...
Q: What is the basic configuration and OpSw settings for a section of the PM42 when configured for circuit breaker control? A: The PM42 is a 4 section multi-purpose device where each of the four sections can be individually configured to act as either a circuit breaker, or automatic reverse loop controller. The PM42 monitors the current flow to the rails and interrupts the connection when it senses that the current demands exceed the upper allowable current level determined by the User controllable Option Switch (OpSw) settings. The power flow of a layout's command control system starts with the command station, or ...
Decibel measurements on SDH164D Digitrax Sound Sound level is a logarithmic measure of the effective sound pressure of a sound relative to a reference value. It is measured in decibels (dB) above a standard reference level. The commonly used "zero" reference sound pressure in air is 20 µPa RMS, which is usually considered the threshold of human hearing (at 1 kHz). Examples of some Loudness rating in both Pa and dB Hearing damage (over long-term exposure, need not be continuous) 0.356 Pa 85 dB Handheld electric mixer 65 dB TV (set at home level) at ...
We recommend testing your new SE8C prior to installation on your layout. The following testing procedures will help familiarize you with the general operation of the SE8C. Track power needs to be ON, a working LocoNet connection and a throttle or PC running DCC control software. Pre-Installation Set-Up 1. Solder one wire from a 12V AC or 15V DC power supply to Pin 3 and the second wire from the power supply to the Pin C on the 44-Pin edge connector; this powers the SE8C. Digitrax manufactures the PS14, which is appropriate for this installation. Multiple SE8Cs can be powered ...
Digital Command Control (DCC) has specific electrical requirements that must be provided for your layout control system to operate properly.Input PowerAll DCC systems require an external power supply. Digitrax manufactures several power supplies for our command stations and boosters: The 3 Amp PS415 (the Zephyr Xtra power supply) The 5 Amp PS515 for all Digitrax 5 amp command stations and boosters The powerful 20 Amp PS2012 can be used for multiple 5 and 8 amp command stations and boosters Additionally, the PS14 is available to power various other devices for your railroad. Digitrax strongly encourages you to use our power supplies to insure satisfactory ...
IPLING From time to time the latest DT602 family throttle firmware will be updated and will be posted on the product support page. These updates may slightly modify the DT602's operation, based on customer feedback/requests and priority support issues discovered. If you are happy with the operation of your DT602, and have no issues or new features you may want, it is not required to perform an available update. All DT602 family throttles should only be firmware updated or IPL'd while plugged directly into a working LocoNet. The Digitrax provided DMF file for field updating DT602's can be used for IPL of any ...
Digitrax Complete Train Control By Zana & A.J. Ireland Digitrax Complete Train Control makes reliable, realistic train operation and simplified layout wiring a reality. Digital Command Control is incorporated within the Digitrax system to let you control multiple trains independently on the same section of track without blocking. In the real world, engineers control the speed and direction of real trains. Engines operate under their own power independent of the track. Each engine has its own motion characteristics like how fast it speeds up (acceleration) and how long it takes to slow down (deceleration). A locomotive's performance is influenced by ...