"I had two Proto 1000 RDC's that I wanted to convert.
After opening up the first one, I did what I usually do, yanked out all the circuit boards and such, threw them over my shoulder and commenced to hardwiring the decoder into the unit.
Everything went fine, and I took it with me to a friend's railroad to enjoy what I had done.
After I got there and played a bit, my friend commented that wasn't it neat that the Proto 1000 series has wiring connections on the circuit board in the locomotive, making things considerably easier.
Wiring points?"
Well, as it turns out, there are connection points on most of the Proto 1000 circuit boards, but there is nothing about that in the instruction sheets.
In fact, the only way to know is if someone tells you.
Once you know this minor fact, you can Google your specific locomotive and there usually are directions which are specific to the locomotive written by some soul who has gone through the same experience you have.
It's disturbingly easy.
Here, a basic Proto 1000 locomotive; in this case, it's an RSC-2:
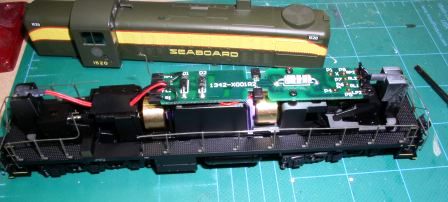
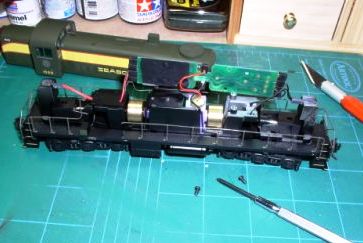
The circuit board is mounted atop the mechanism with two Phillips head screws.
All of the electrical connections are fitted to this board with little plastic caps holding them in place.
Two diodes and a resistor are used to operate the headlights in a conventional DC environment.
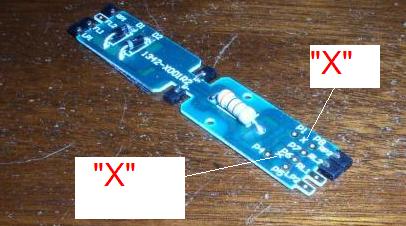
Upon closer examination, we see several connections with small openings that are marked "P1, P2, P4, P5 P6, P7 and P8".
We also see two points marked with an "X".
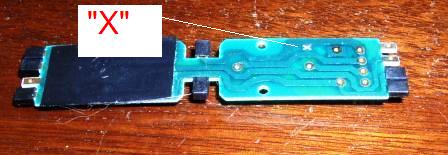
Unscrewing the board and turning it over, we see another "X" on the bottom.
Some of the circuit boards are even sporting enough to include the text "For DCC, Cut Here".
The conducting foil of the circuit board is cut at the three "X" points. A motor tool is probably easiest here, but you need to exercise great care not to cut anything else; one of the small burrs seems to be a better choice than the cut-off wheel.
The diodes and the resistor also need to be removed [well, maybe, see note below. Ed.]; but check online or with a friend who has done this conversion for advice.
You then make the decoder connections to these points:
- P1 - Orange
- P2 (which is not present on the board) - Yellow*
- P4 - Black
- P5 - Gray
- P6 - White*
- P7 - Blue*
- P8 - Red
* - See headlight info below
The circuit board makes all of the proper motor and track pickup connections.
You may want to handle the headlights somewhat differently.
In any case, test the locomotive before you close things up.
Headlights The headlights for both Proto 1000 and Proto 2000 have been set up with three volt bulbs, with the diodes "dropping" the current for the bulbs in a DC environment; this is done so that the headlight will burn brightly at most locomotive speeds.
With DCC, this is unnecessary, but most mobile decoders will only provide a much higher voltage, which burns out the light bulbs.
You may find it easier to replace these low voltage bulbs with 14 volt ones.
In doing so, it seems to be easier to just directly wire these bulbs to the decoder via the yellow and white wires, with the blue wire being the common connection to the other side of both bulbs.
Others have replaced these low voltage bulbs with LED's; a Google search will often turn up some helpful hints for this process.
Likewise, there is no pad connection for the green wire connection (the additional function), which would also be hardwired, using the blue connection for common electrical return.
A Closer Look at the Board Here, a board removed from a Proto 1000 locomotive:
And, the bottom side of the board:
Note: As could be expected, variations have turned up.
A recent conversion of an RS-11 to DCC was made considerably easier since all 7 of the necessary wires had solder points on the circuit board.
It became a matter of simply cutting the "X" points and soldering wires.
It was not necessary to remove the diodes or resistors, and the conversion was performed in minutes.